
728x90
★ JAVASCRIPT 로 CSS 조작하기
- 불편한 방법
//BOM
// box.style = 'font-size : 2rem;';

//DOM
// box.setAttribute('style', 'font-size : 3rem;');

//관리 불편;; > 모든걸 문자열로 조작
box.style = 'backgroud-color : black; color : white; font-size : 3rem;';- 유용한 방법
box.style.color = 'blue';
box.style['color'] = 'white';

box.style.backgroundColor = 'black';
box.style['background-color'] = 'white';

box.style['font-size'] = '3rem';- 자바스크립트 > CSS로 정의된 속성값을 읽어오지 못한다. 단, 인라인 시트값으로 되어 있는 CSS는 읽어올 수 있다. 즉, 임베디드와 외부 스타일시트값을 읽어오지 못한다.
alert(box.style.width); //200px(X), null(O)- 방법 1 : 인라인 시트값을 주었을 경우에만 가능
box.style.width = parseInt(box.style.width) + 50 + 'px';- 방법 2 : 현재 서식을 읽어오는 방식
const list = window.getComputedStyle(box);
alert(list.getPropertyValue('width'));
■ 응용 ex) 폰트 사이즈 조절
const btn1 = document.getElementById('btn1');
const btn2 = document.getElementById('btn2');
const content = document.getElementById('content');

let fontSize = 16; //16px;

btn1.addEventListener('click', function() {
    fontSize +=1;
    content.style.fontSize = fontSize + 'px';
});

btn2.addEventListener('click', function() {
    fontSize -=1;
    content.style.fontSize = fontSize + 'px';
});
■ 마우스 위치에 따라 박스가 움직임
<style>

    #box1 {
        position : absolute;
        left : 0px;
        top : 0px;
    }

</style>

<body>
    <!--  -->

    <!-- div#box$.box{상자$}*5 -->
    <div id="box1" class="box bg-red">상자1</div>
    <div id="box2" class="box bg-orange">상자2</div>
    <div id="box3" class="box bg-yellow">상자3</div>
    <div id="box4" class="box bg-blue">상자4</div>
    <div id="box5" class="box bg-green">상자5</div>


    <script>

        const box1 = document.getElementById('box1');

        window.onmousedown = function() {

            // alert(`${event.clientX}:${event.clientY}`);
            box1.style.left = event.clientX + 'px';
            box1.style.top = event.clientY + 'px';

        };

    </script>
</body>
■ 모든 박스가 움직임
<script>

    const box1 = document.getElementById('box1');
    const list = document.getElementsByClassName('box');
    let index = 0;
    let zindex = 1;

    window.onmousedown = function() {

        // alert(`${event.clientX}:${event.clientY}`);

        // box1.style.left = event.clientX + 'px';
        // box1.style.top = event.clientY + 'px';

        list[index].style.left = event.clientX -100 + 'px';
        list[index].style.top = event.clientY -100 + 'px';
        list[index].style.zIndex = zindex;

        index++;
        zindex++;

        if(index >= list.length) index = 0;

    };

</script>
■ 화면 클릭 > 상자 생성 > 이동
<script>

    //화면 클릭 > 상자 생성 > 이동

    const colors = ['bg-red', 'bg-yellow', 'bg-blue', 'bg-orange', 'bg-green'];

    let index = 0;

    window.onmousedown = function() {

        if(event.buttons == 1) {

            //<div class="box"></div>
            let box = document.createElement('div'); //<div></div>


            box.classList.add('box'); //클래스 속성을 주는것 <div class="box"></div>
            //box.classList.add('bg-red'); //<div class="box bg-red"></div>
            box.classList.add(colors[index]);
            index++;
            if(index>= colors.length) index = 0;

            box.style.left = event.clientX - 100 + 'px';
            box.style.top = event.clientY - 100 + 'px';

            document.body.appendChild(box);

        }//if

    };//window

</script>
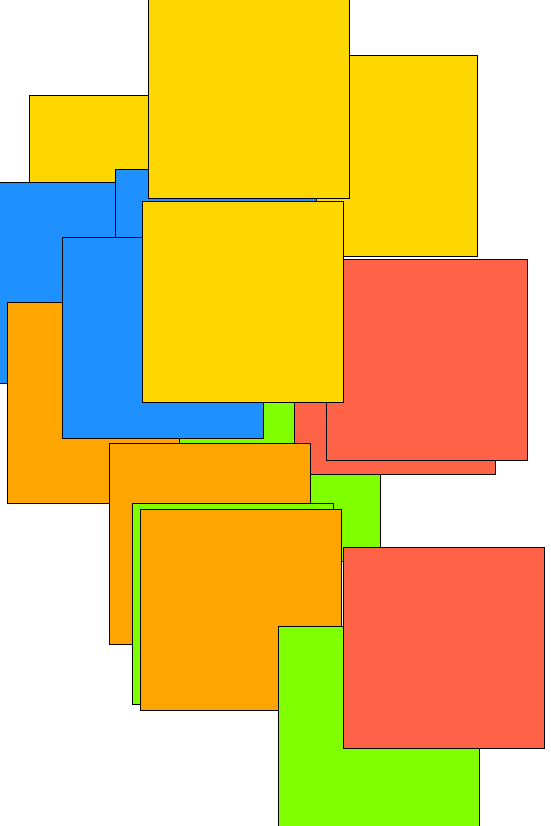
■ 화면 클릭 > 상자를 생성하고, 컨트롤하고 선택하면 해당 상자가 삭제됨.
<script>

    //화면 클릭 > 상자 생성 > 이동

    const colors = ['bg-red', 'bg-yellow', 'bg-blue', 'bg-orange', 'bg-green'];

    let index = 0;

    window.onmousedown = function() {

        // console.log(event.ctrlKey); //컨트롤 키를 누르고있는지 확인

        if(event.buttons == 1 && !event.ctrlKey) {

            //<div class="box"></div>
            let box = document.createElement('div'); //<div></div>


            box.classList.add('box'); //클래스 속성을 주는것 <div class="box"></div>
            //box.classList.add('bg-red'); //<div class="box bg-red"></div>
            box.classList.add(colors[index]);
            index++;
            if(index>= colors.length) index = 0;

            box.style.left = event.clientX - 100 + 'px';
            box.style.top = event.clientY - 100 + 'px';

            document.body.appendChild(box);

        } else if (event.buttons == 1 && event.ctrlKey) {

            // if(event.target.nodeName == 'DIV')
            if(event.target.classList.contains('box')) {

                // document.body.removeChild(event.target);
                event.target.remove();

            }

        }

    };//window

</script>- 실행결과
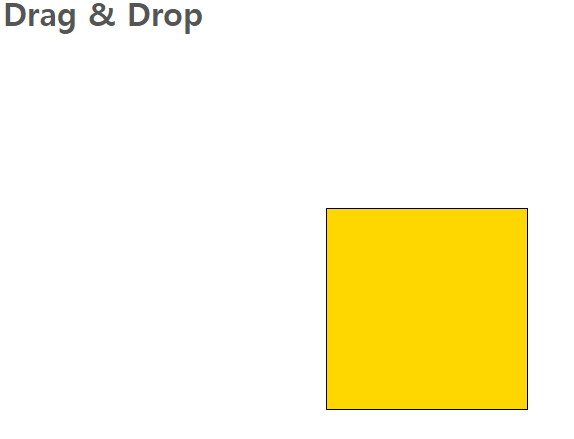
■ Drag & Drop
<!DOCTYPE html>
<html lang="en">
<head>
    <meta charset="UTF-8">
    <meta http-equiv="X-UA-Compatible" content="IE=edge">
    <meta name="viewport" content="width=device-width, initial-scale=1.0">
    <title>Document</title>
    <link rel="stylesheet" href="css/example.css">
    <style>
        #box {
            position : absolute;
            left : 0;
            top : 0;
        }

    </style>
</head>
<body>
    <!--  -->
    <h1>Drag & Drop</h1>

    <div id="box" class="box bg-yellow"></div>

    <script>

        const box = document.getElementById('box');
        let isDown = false;
        let x = 0;
        let y = 0;

        window.onmousedown = function() {

            //지금 누른곳이 상자냐? 배경이냐?
            // alert(event.target.id);

            if (event.target.id == 'box') {
                isDown = true;
                x = event.offsetX; //상자내에서 눌린 마우스 좌표
                y = event.offsetY; //상자내에서 눌린 마우스 좌표
            }

        };


        window.onmousemove = function() {
            if (isDown) {
                box.style.left = event.clientX - x + 'px';
                box.style.top = event.clientY - y + 'px';
            }
        };


        window.onmouseup = function() {
            isDown = false;
        };
    </script>
</body>
</html>- 실행 결과
■ 범용 적으로 사용할 수 있는 Draggable
<!DOCTYPE html>
<html lang="en">
<head>
    <meta charset="UTF-8">
    <meta http-equiv="X-UA-Compatible" content="IE=edge">
    <meta name="viewport" content="width=device-width, initial-scale=1.0">
    <title>Document</title>
    <link rel="stylesheet" href="css/example.css">
    <style>
        .draggable {
            position : absolute;
            left : 0;
            top : 0;
            user-select : none;
        }
    </style>
</head>
<body onselectstart="return false">
    <!--  -->
    <h1 class="draggable">제목이다</h1>
    <div class="box bg-red draggable">상자1</div>
    <div class="box bg-yellow draggable">상자2</div>
    <div class="box bg-blue draggable">상자3</div>
    <button class="draggable">버튼</button>

    <script>

        let isDown = false;
        let x = 0, y = 0;
        let obj; //드래그 대상
        let zindex = 0;

        window.onmousedown = function() {
            if (event.target.classList.contains('draggable')){
                obj = event.target; //드래그 대상
                isDown = true;
                x = event.offsetX;
                y = event.offsetY;

                zindex++;
                obj.style.zIndex = zindex;
            }

        };

        window.onmousemove = function() {
            if(isDown) {
                obj.style.left = event.clientX - x + 'px';
                obj.style.top = event.clientY - y + 'px';
            }
        };

        window.onmouseup = function() {
            isDown = false;
        };

    </script>
</body>
</html>
728x90
'웹페이지' 카테고리의 다른 글
| JAVASCRIPT STEP 45 - Calendar (0) | 2023.04.28 |
|---|---|
| JAVASCRIPT STEP 44 - CSS (0) | 2023.04.28 |
| JAVASCRIPT STEP 42 - Template, Event (0) | 2023.04.27 |
| JAVASCRIPT STEP 41 - CLOSURE (0) | 2023.04.27 |
| JAVASCRIPT STEP 40 - Arrow, Stream (0) | 2023.04.27 |
728x90
★ JAVASCRIPT 로 CSS 조작하기
- 불편한 방법
//BOM
// box.style = 'font-size : 2rem;';

//DOM
// box.setAttribute('style', 'font-size : 3rem;');

//관리 불편;; > 모든걸 문자열로 조작
box.style = 'backgroud-color : black; color : white; font-size : 3rem;';- 유용한 방법
box.style.color = 'blue';
box.style['color'] = 'white';

box.style.backgroundColor = 'black';
box.style['background-color'] = 'white';

box.style['font-size'] = '3rem';- 자바스크립트 > CSS로 정의된 속성값을 읽어오지 못한다. 단, 인라인 시트값으로 되어 있는 CSS는 읽어올 수 있다. 즉, 임베디드와 외부 스타일시트값을 읽어오지 못한다.
alert(box.style.width); //200px(X), null(O)- 방법 1 : 인라인 시트값을 주었을 경우에만 가능
box.style.width = parseInt(box.style.width) + 50 + 'px';- 방법 2 : 현재 서식을 읽어오는 방식
const list = window.getComputedStyle(box);
alert(list.getPropertyValue('width'));
■ 응용 ex) 폰트 사이즈 조절
const btn1 = document.getElementById('btn1');
const btn2 = document.getElementById('btn2');
const content = document.getElementById('content');

let fontSize = 16; //16px;

btn1.addEventListener('click', function() {
    fontSize +=1;
    content.style.fontSize = fontSize + 'px';
});

btn2.addEventListener('click', function() {
    fontSize -=1;
    content.style.fontSize = fontSize + 'px';
});
■ 마우스 위치에 따라 박스가 움직임
<style>

    #box1 {
        position : absolute;
        left : 0px;
        top : 0px;
    }

</style>

<body>
    <!--  -->

    <!-- div#box$.box{상자$}*5 -->
    <div id="box1" class="box bg-red">상자1</div>
    <div id="box2" class="box bg-orange">상자2</div>
    <div id="box3" class="box bg-yellow">상자3</div>
    <div id="box4" class="box bg-blue">상자4</div>
    <div id="box5" class="box bg-green">상자5</div>


    <script>

        const box1 = document.getElementById('box1');

        window.onmousedown = function() {

            // alert(`${event.clientX}:${event.clientY}`);
            box1.style.left = event.clientX + 'px';
            box1.style.top = event.clientY + 'px';

        };

    </script>
</body>
■ 모든 박스가 움직임
<script>

    const box1 = document.getElementById('box1');
    const list = document.getElementsByClassName('box');
    let index = 0;
    let zindex = 1;

    window.onmousedown = function() {

        // alert(`${event.clientX}:${event.clientY}`);

        // box1.style.left = event.clientX + 'px';
        // box1.style.top = event.clientY + 'px';

        list[index].style.left = event.clientX -100 + 'px';
        list[index].style.top = event.clientY -100 + 'px';
        list[index].style.zIndex = zindex;

        index++;
        zindex++;

        if(index >= list.length) index = 0;

    };

</script>
■ 화면 클릭 > 상자 생성 > 이동
<script>

    //화면 클릭 > 상자 생성 > 이동

    const colors = ['bg-red', 'bg-yellow', 'bg-blue', 'bg-orange', 'bg-green'];

    let index = 0;

    window.onmousedown = function() {

        if(event.buttons == 1) {

            //<div class="box"></div>
            let box = document.createElement('div'); //<div></div>


            box.classList.add('box'); //클래스 속성을 주는것 <div class="box"></div>
            //box.classList.add('bg-red'); //<div class="box bg-red"></div>
            box.classList.add(colors[index]);
            index++;
            if(index>= colors.length) index = 0;

            box.style.left = event.clientX - 100 + 'px';
            box.style.top = event.clientY - 100 + 'px';

            document.body.appendChild(box);

        }//if

    };//window

</script>
■ 화면 클릭 > 상자를 생성하고, 컨트롤하고 선택하면 해당 상자가 삭제됨.
<script>

    //화면 클릭 > 상자 생성 > 이동

    const colors = ['bg-red', 'bg-yellow', 'bg-blue', 'bg-orange', 'bg-green'];

    let index = 0;

    window.onmousedown = function() {

        // console.log(event.ctrlKey); //컨트롤 키를 누르고있는지 확인

        if(event.buttons == 1 && !event.ctrlKey) {

            //<div class="box"></div>
            let box = document.createElement('div'); //<div></div>


            box.classList.add('box'); //클래스 속성을 주는것 <div class="box"></div>
            //box.classList.add('bg-red'); //<div class="box bg-red"></div>
            box.classList.add(colors[index]);
            index++;
            if(index>= colors.length) index = 0;

            box.style.left = event.clientX - 100 + 'px';
            box.style.top = event.clientY - 100 + 'px';

            document.body.appendChild(box);

        } else if (event.buttons == 1 && event.ctrlKey) {

            // if(event.target.nodeName == 'DIV')
            if(event.target.classList.contains('box')) {

                // document.body.removeChild(event.target);
                event.target.remove();

            }

        }

    };//window

</script>- 실행결과
■ Drag & Drop
<!DOCTYPE html>
<html lang="en">
<head>
    <meta charset="UTF-8">
    <meta http-equiv="X-UA-Compatible" content="IE=edge">
    <meta name="viewport" content="width=device-width, initial-scale=1.0">
    <title>Document</title>
    <link rel="stylesheet" href="css/example.css">
    <style>
        #box {
            position : absolute;
            left : 0;
            top : 0;
        }

    </style>
</head>
<body>
    <!--  -->
    <h1>Drag & Drop</h1>

    <div id="box" class="box bg-yellow"></div>

    <script>

        const box = document.getElementById('box');
        let isDown = false;
        let x = 0;
        let y = 0;

        window.onmousedown = function() {

            //지금 누른곳이 상자냐? 배경이냐?
            // alert(event.target.id);

            if (event.target.id == 'box') {
                isDown = true;
                x = event.offsetX; //상자내에서 눌린 마우스 좌표
                y = event.offsetY; //상자내에서 눌린 마우스 좌표
            }

        };


        window.onmousemove = function() {
            if (isDown) {
                box.style.left = event.clientX - x + 'px';
                box.style.top = event.clientY - y + 'px';
            }
        };


        window.onmouseup = function() {
            isDown = false;
        };
    </script>
</body>
</html>- 실행 결과
■ 범용 적으로 사용할 수 있는 Draggable
<!DOCTYPE html>
<html lang="en">
<head>
    <meta charset="UTF-8">
    <meta http-equiv="X-UA-Compatible" content="IE=edge">
    <meta name="viewport" content="width=device-width, initial-scale=1.0">
    <title>Document</title>
    <link rel="stylesheet" href="css/example.css">
    <style>
        .draggable {
            position : absolute;
            left : 0;
            top : 0;
            user-select : none;
        }
    </style>
</head>
<body onselectstart="return false">
    <!--  -->
    <h1 class="draggable">제목이다</h1>
    <div class="box bg-red draggable">상자1</div>
    <div class="box bg-yellow draggable">상자2</div>
    <div class="box bg-blue draggable">상자3</div>
    <button class="draggable">버튼</button>

    <script>

        let isDown = false;
        let x = 0, y = 0;
        let obj; //드래그 대상
        let zindex = 0;

        window.onmousedown = function() {
            if (event.target.classList.contains('draggable')){
                obj = event.target; //드래그 대상
                isDown = true;
                x = event.offsetX;
                y = event.offsetY;

                zindex++;
                obj.style.zIndex = zindex;
            }

        };

        window.onmousemove = function() {
            if(isDown) {
                obj.style.left = event.clientX - x + 'px';
                obj.style.top = event.clientY - y + 'px';
            }
        };

        window.onmouseup = function() {
            isDown = false;
        };

    </script>
</body>
</html>
728x90
'웹페이지' 카테고리의 다른 글
| JAVASCRIPT STEP 45 - Calendar (0) | 2023.04.28 |
|---|---|
| JAVASCRIPT STEP 44 - CSS (0) | 2023.04.28 |
| JAVASCRIPT STEP 42 - Template, Event (0) | 2023.04.27 |
| JAVASCRIPT STEP 41 - CLOSURE (0) | 2023.04.27 |
| JAVASCRIPT STEP 40 - Arrow, Stream (0) | 2023.04.27 |