안드로이드
안드로이드 프로그래밍 - 다용도 앱 만들기 3
IT의 큰손
2023. 1. 18. 16:31
728x90
- 앱의 기능 설명
- 1. 로그인 기능
- 2. 메모장
- 3. 달력
- 4. 연락처
- 5. 그림판
- 6. 미니게임
- 7. 계산기
- 8. 스톱워치
- 9. 가계부
- 메모장
- 메모장 xml 코드
더보기
<?xml version="1.0" encoding="utf-8"?>
<RelativeLayout xmlns:android="http://schemas.android.com/apk/res/android"
    xmlns:app="http://schemas.android.com/apk/res-auto"
    android:layout_width="match_parent"
    android:layout_height="match_parent"
    android:background="#25E9FD35"
    xmlns:tools="http://schemas.android.com/tools">

    <Spinner
        android:id="@+id/category"
        android:layout_height="40dp"
        android:layout_width="wrap_content"
        android:layout_toStartOf="@+id/register"
        android:entries="@array/category"
        android:layout_toLeftOf="@+id/register" />

    <EditText
        android:id="@+id/memo"
        android:layout_width="match_parent"
        android:layout_height="wrap_content"
        android:layout_below="@+id/category"
        android:layout_toStartOf="@+id/register"
        android:backgroundTint="@color/colorPrimary"
        tools:text="메모 입력"
        android:layout_toLeftOf="@+id/register" />

    <Button
        android:id="@+id/register"
        android:layout_width="wrap_content"
        android:layout_height="wrap_content"
        android:layout_above="@+id/recyclerView"
        android:layout_alignParentEnd="true"
        android:layout_alignParentTop="true"
        android:backgroundTint="@color/colorPrimary"
        android:text="@string/button_register"
        android:textColor="@android:color/white"
        android:textSize="@dimen/text_size_medium"
        android:textStyle="bold"
        android:layout_alignParentRight="true" />

    <android.support.v7.widget.RecyclerView
        android:id="@+id/recyclerView"
        android:layout_width="match_parent"
        android:layout_height="match_parent"
        android:layout_below="@+id/memo" />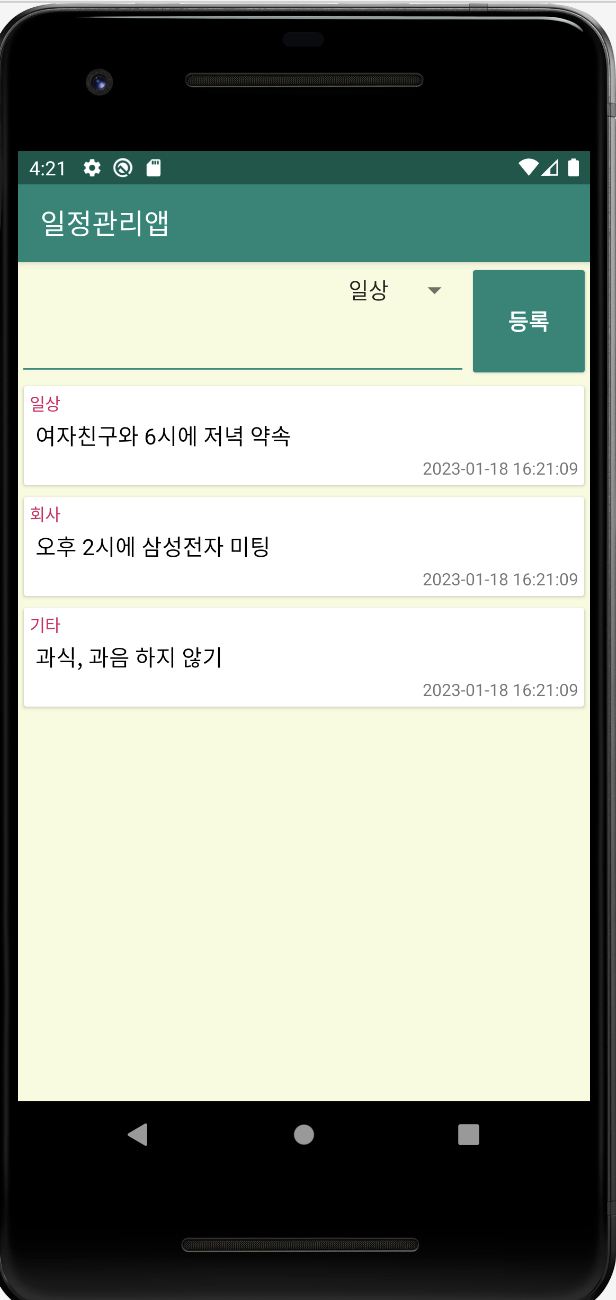
</RelativeLayout>- 스피너를 통해 카테고리를 선택할 수 있도록 하였다.
- EditText를 통하여 메모를 할 내용을 입력을 받는다.
- Register 버튼을 통하여 해당 메모를 저장한다.
- 메모장 JAVA 코드
더보기
public class Activity3 extends AppCompatActivity implements View.OnClickListener {

    Context context;
    RecyclerView memoList;
    MemoListAdapter memoListAdapter; // 리사이클러뷰의 어댑터
    LinearLayoutManager layoutManager; //리사이클러뷰의 레이아웃 결정

    // 아래는 메모 작성 시 필요한 멤버들
    Spinner categorySpinner;
    EditText memoEdit;

    @Override
    protected void onCreate(Bundle savedInstanceState) {
        super.onCreate(savedInstanceState);
        setContentView(R.layout.layout3);

        context = this;
        setView();
    }

    // 레이아웃에서 뷰 찾고 버튼 리스너 설정
    private void setView() {
        categorySpinner = findViewById(R.id.category);
        memoEdit = findViewById(R.id.memo);

        Button registerButton = findViewById(R.id.register);
        registerButton.setOnClickListener(this);

        memoList = findViewById(R.id.recyclerView);

        setRecyclerView();
        setMemoListItem();
    }

    // 리사이클러뷰 설정: 레이아웃 매니저, 어댑터 설정
    private void setRecyclerView() {
        layoutManager = new LinearLayoutManager(context, LinearLayoutManager.VERTICAL, false);
        memoList.setLayoutManager(layoutManager);

        memoListAdapter = new MemoListAdapter(context, R.layout.row_memo_item, new ArrayList<MemoItem>());
        memoList.setAdapter(memoListAdapter);
    }

    // 리사이클러뷰에 아이템 지정, 설정할 더미 아이템은 getMemoList에서 생성
    private void setMemoListItem () {
        ArrayList<MemoItem> list = getMemoDummyList();
        memoListAdapter.addItemList(list);
    }

    private ArrayList<MemoItem> getMemoDummyList() {
        ArrayList<MemoItem> list = new ArrayList<>();

        // sample items
        MemoItem item1 = new MemoItem("일상", "여자친구와 6시에 저녁 약속");
        MemoItem item2 = new MemoItem("회사", "오후 2시에 삼성전자 미팅");
        MemoItem item3 = new MemoItem("기타", "과식, 과음 하지 않기");
        list.add(item1);
        list.add(item2);
        list.add(item3);

        return list;
    }

    // 등록 버튼 클릭하면, 메모 등록 메서드 실행
    @Override
    public void onClick(View v) {
        registerMemo();
    }


    // 메모 등록 메서드: 아이템 추가, 뷰 초기화, 키패드 숨기기
    private void registerMemo () {
        String category = (String) categorySpinner.getSelectedItem();
        String memo = memoEdit.getText().toString();

        if(TextUtils.isEmpty(memo)) {
            Toast.makeText(context, R.string.msg_memo_input, Toast.LENGTH_SHORT) .show();
            return;
        }

        addMemoItem(category, memo);

        categorySpinner.setSelection(0);
        memoEdit.setText("");

        hideKeyboard();
    }

    // 키패드 숨기기 메서드
    private void hideKeyboard() {
        View view = this.getCurrentFocus();
        if (view != null) {
            InputMethodManager imm =
                    (InputMethodManager) getSystemService(Context.INPUT_METHOD_SERVICE);
            imm.hideSoftInputFromWindow(view.getWindowToken(), 0);
        }
    }

    // 아이템을 어댑터에 추가하는 매서드
    private void addMemoItem(String category, String memo) {
        MemoItem item = new MemoItem(category, memo);

        memoListAdapter.addItem(item);
    }
}- 리사이클러뷰의 어댑터와 레이아웃을 사용
- 레이아웃에서의 뷰를 찾고 해당 뷰에 OnClickListener를 통하여 설정한다
- 리사이클러뷰의 레이아웃 매니저, 어댑터를 설정하여 준다.
- 아이템을 지정한 후, getMemoList에서 생성하였다.
- ArratList 즉, 배열을 사용하여, 해당 메모들이 배열에 저장될 수 있도록 하였다.
- 등록 버튼을 클릭하면, 메모 등록 메서드를 실행 시킨다
- 아이템 추가, 뷰 초기화, 키패드 숨기기 등
728x90