Spring
Spring STEP 11 - Spring Security
IT의 큰손
2023. 6. 20. 12:28
728x90
★ 프로젝트 생성
- New > Spring Legacy Project > Spring MVC Project > "SecurityTest" > "com.test.security" > Finish
★ 스프링 시큐리티
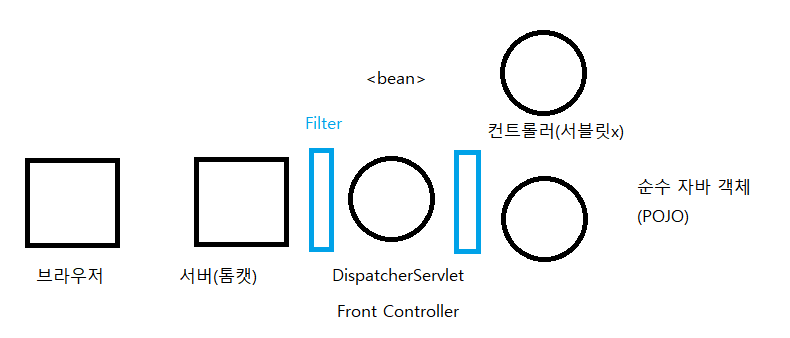
- 기존 Servlet/JSP > 인증(증명, 인증티켓) + 허가(권한) > 세션 기반 인증
- 동작 방식 > 서블릿 필터와 스프링 인터셉터를 사용해서 보안을 처리
■ 기초셋팅
스프링 프로젝트 일괄 적용
수업. Contribute to pinnpublic/class development by creating an account on GitHub.
github.com
- 의존성 추가 -> pom.xml
<dependency>
   <groupId>org.springframework.security</groupId>
   <artifactId>spring-security-web</artifactId>
   <version>5.0.7.RELEASE</version>
</dependency>

<dependency>
   <groupId>org.springframework.security</groupId>
   <artifactId>spring-security-config</artifactId>
   <version>5.0.7.RELEASE</version>
</dependency>

<dependency>
   <groupId>org.springframework.security</groupId>
   <artifactId>spring-security-core</artifactId>
   <version>5.0.7.RELEASE</version>
</dependency>

<dependency>
   <groupId>org.springframework.security</groupId>
   <artifactId>spring-security-taglibs</artifactId>
   <version>5.0.7.RELEASE</version>
</dependency>
■ 파일 셋팅
1. security-context.xml -> /webapp/WEB-INF/spring/security-context.xml
- root-context.xml, servlet-context.xml 처럼 스프링 설정하는 파일(Context)
- 기존 컨텍스트와 분리해서 설정할 수 있다. > 단독 설정
spring bean configuration -> security-context.xml 생성
namespace -> security 클릭
2. web.xml
- 스프링 시큐리티가 스프링 MVC에서 사용 > 필터를 사용해서 스프링 시큐리티가 스프링 동작에 관여할 수 있도록 설정
- web.xml -> 필터 추가
<filter>
   <filter-name>springSecurityFilterChain</filter-name>
   <filter-class>org.springframework.web.filter.DelegatingFilterProxy</filter-class>
</filter>

<filter-mapping>
   <filter-name>springSecurityFilterChain</filter-name>
   <url-pattern>/*</url-pattern>
</filter-mapping>
3. 추가 작업
- 3.1 security-context.xml 기본 구문을 설정
<security:http>
    <security:form-login/>
</security:http>

<security:authentication-manager>

</security:authentication-manager>- 3.2 security-context.xml 인식 > web.xml 추가
<context-param>
   <param-name>contextConfigLocation</param-name>
   <param-value>
      /WEB-INF/spring/root-context.xml
      /WEB-INF/spring/security-context.xml <- 이 1줄을 추가하면 된다.
   </param-value>
</context-param>
★ 테스트를 위한 URI 설계
- 통제가 필요한 URI를 설계 + 스프링 시큐리티를 적용
- /index.do > 로그인(O), 로그인(X) > 모든 사용자 접근 가능
- /member.do > 로그인(O) > 회원만 접근 가능
- /admin.do > 로그인(O) > 회원 중 관리자 권한이 있는 사용자만 접근 가능
■ 파일 생성
- com.test.controller > TestController.java
- views > index.jsp
		> member.jsp
        > admin.jsp
        > template.jsp
- views > inc > header.jsp
■ servlet-context.xml -> scan 추가
<context:component-scan base-package="com.test.controller" />
■ TestController -> controller-> GetMapping
@Controller
@Log4j
public class TestController {

	@GetMapping("/index.do")
	public String index() {

		log.info("TestController > 모든 사용자 페이지");

		return "index";
	}

	@GetMapping("/member.do")
	public String member() {

		log.info("TestController > 회원 전용 페이지");

		return "member";
	}

	@GetMapping("/admin.do")
	public String admin() {

		log.info("TestController > 관리자 전용 페이지");

		return "admin";
	}

    @GetMapping("/template.do")
	public String template() {

		return "template";
	}

}
■ jsp -> 각 페이지별 header와 기본 구별 코드 구성
<%@ page language="java" contentType="text/html; charset=UTF-8"
    pageEncoding="UTF-8"%>
<%@ taglib prefix="c" uri="http://java.sun.com/jsp/jstl/core" %>
<!DOCTYPE html>
<html>
<head>
<meta charset="UTF-8">
<title>Insert title here</title>
<link rel="stylesheet" href="https://me2.do/5BvBFJ57">
<style>

</style>
</head>
<body>
	<!-- admin.jsp -->
	<%@ include file="/WEB-INF/views/inc/header.jsp" %>

	<h2>
		<span class="material-symbols-outlined">face</span>
		Admin Page
	</h2>

	<div>
		관리자만 접근 가능한 페이지입니다.
	</div>


<script src="https://ajax.googleapis.com/ajax/libs/jquery/3.6.4/jquery.min.js"></script>
<script>

</script>
</body>
</html>
★ 인증(Authentication), 허가(권한 부여, Authorization)
- 스프링 시큐리티
- AuthenticationManager
- 인증 매니저
- 가장 중심 + 가장 중요한 역할
- 인증을 담당한다.- AuthenticationProvider
- 인증 제공자
- 실제로 인증 작업을 진행- UserDetailsService
- 사용자 정보 + 사용자의 권한 > 관리
■ 로그인, 로그아웃 인증
- security-context.xml -> 수정
- 특정 URI + 액세스 설정
pattern: URI 패턴
access : 권한 > 표현식(***) or 권한명
> Authority(권한-글쓰기, 열람, 승인)- 코드 작성
<security:intercept-url pattern="/index.do" access="permitAll"/>
<security:intercept-url pattern="/member.do" access="hasRole('ROLE_MEMBER')"/>- 화면 -> member 페이지로 들어가게 되면 로그인 권한을 요청하게 된다.
■ 단순 로그인 처리
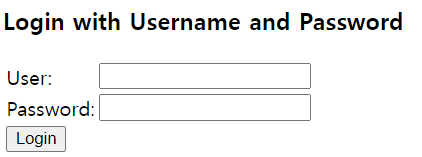
- 자동 생성 로그인 페이지 사용
- 계정 정보 > XML 정의 > 메모리 상 관리
- security-context.xml -> 수정
**** 스프링 시큐리티에서 username 의미
- 일반 시스템(userid) == 스프링 시큐리티(username)
- '홍길동' != username
- 'hong' == username- 코드 작성
<security:authentication-manager>
    <security:authentication-provider>
        <security:user-service>
            <security:user name="hong" password="1111" authorities="ROLE_MEMBER"/>
        </security:user-service>
    </security:authentication-provider>
</security:authentication-manager>- 에러
There is no PasswordEncoder mapped for the id "null"- 수정
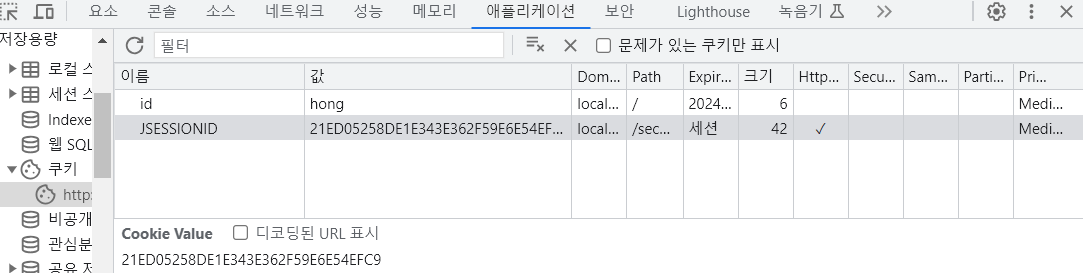
<security:user name="hong" password="{noop}1111" authorities="ROLE_MEMBER"/>- 쿠키 확인 -> 티켓 발급
■ 관리자 사용자 설정
- 로그인 계층
1. 비회원 (X)
2. 회원 ('ROLE_MEMBER')
3. 관리자 ('ROLE_MEMBER', 'ROLE_ADMIN')- 코드 작성 -> uri 추가
<security:intercept-url pattern="/admin.do" access="hasRole('ROLE_ADMIN')"/>- 코드 작성 -> 관리자 회원 추가
<security:user name="admin" password="{noop}1111" authorities="ROLE_ADMIN,ROLE_MEMBER"/>
■ 접근 권한 메시지 처리
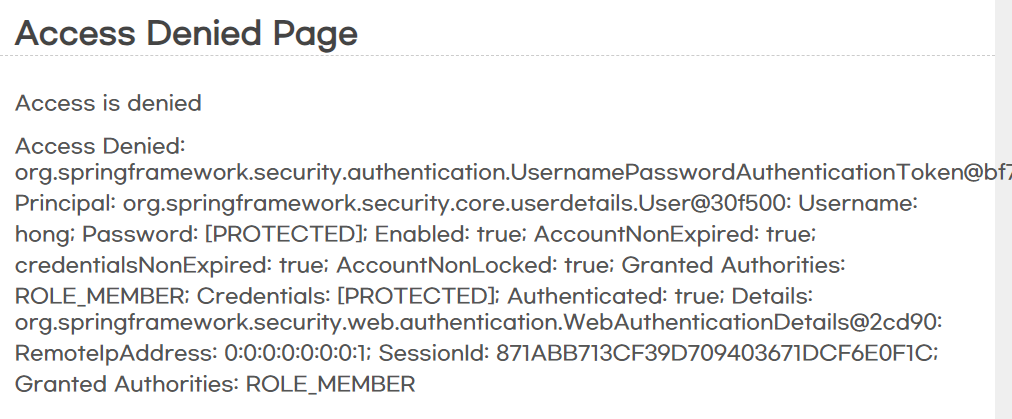
- 로그인을 한 상태에서 접근 불가능한 URI를 접근하면 에러가 발생 > 403
- 방법
1. AccessDeniedHandler 직접 구현
2. 단순 URI 지정 > forward- 에러 페이지 작성
- com.test.controller > AuthController.java
- views > accesserror.jsp- AuthController.java -> 작성
@GetMapping("/accesserror.do")
public String accesserror(Authentication auth, Model model) {

    log.info("Access Denied: " + auth);

    model.addAttribute("msg", "Access Denied: " + auth);

    return "accesserror";
}- security-context.xml -> 작성
<security:access-denied-handler error-page="/accesserror.do"/>- accesserror.jsp
<!-- acesserror.jsp -->
<%@ include file="/WEB-INF/views/inc/header.jsp" %>

<h2>Access Denied Page</h2>

<div>${SPRING_SECURITY_403_EXCEPTION.getMessage()}</div>

<div>${msg}</div>- 실행 결과
■ 접근 권한 메시지 처리 - 직접 구현하기 ver
- 파일 생성
com.test.auth > CustomAccessDeniedHandler.java- CustomAcessDeniedHandler.java -> 코드 작성
@Override
public void handle(HttpServletRequest request, HttpServletResponse response,
        AccessDeniedException accessDeniedException) throws IOException, ServletException {

    //403 발생 > request, response 조작

    log.error("Access Denied Handler");
    log.error("Redirect..");

    response.sendRedirect("/security/accesserror.do");

}- security-context.xml 추가
!-- 403 처리 담당자 -->
 <bean id="customAccessDenied"
      class="com.test.auth.CustomAccessDeniedHandler"></bean>

<security:access-denied-handler ref="customAccessDenied"></security:access-denied-handler>
■ 로그인 페이지
- 직접 로그인 페이지 구현 > URI 지정
- AuthController.java > 로그인 페이지 추가
@GetMapping("/customlogin.do")
public String login(String error, String logout, Model model) {

    log.error("error: " + error);
    log.info("logout: " + logout);

    model.addAttribute("error", error);
    model.addAttribute("logout", logout);

    return "customlogin";
}- views -> customlogin.jsp 생성
- <form>의 action이 "/login"이다 + POST
- <input name="username">, <input name="password"> name이 예약어이다.
<!-- customlogin.jsp -->
<%@ include file="/WEB-INF/views/inc/header.jsp" %>

<h2>Custom Login Page</h2>

<div class="message">${error}</div>
<div class="message">${logout}</div>

<form method="POST" action="/security/login">
<table>
    <tr>
        <th>아이디</th>
        <td><input type="text" name="username" required></td>
    </tr>
    <tr>
        <th>암호</th>
        <td><input type="password" name="password" required></td>
    </tr>
</table>
<div>
    <button class="in">로그인</button>
</div>
<input type="hidden" name="${_csrf.parameterName}" value="${_csrf.token}">
</form>- "/login" + GET 요청 -> /customlogin.do 호출
- security-context.xml -> form 추가
<!-- "/login" -->
<security:form-login login-page="/customlogin.do" />- header.jsp 추가
<li class="divider"></li>
<li><a href="/security/customlogin.do">Login</a>
■ CSRF, Cross-site request forgery
- CSRF 공격 > 토큰
<security:csrf diabled="true" />
■ 로그인 > 후속 동작
- 로그인 성공 후에 특정한 동작을 하고 싶을 때
- AuthenticationSuccessHandler 인터페이스를 구현
- com.test.auth > CustomLoginSuccessHandler.java 작성
@Override
public void onAuthenticationSuccess(HttpServletRequest request, HttpServletResponse response,
        Authentication authentication) throws IOException, ServletException {

    log.info("Login Success");

    //권한별 조치
    //- 일반회원 > "/member.do"
    //- 관리자 > "/admin.do"

    List<String> roleNames = new ArrayList<String>();

    authentication.getAuthorities().forEach(authority -> {
        roleNames.add(authority.getAuthority());
    });

    log.info("Role: " + roleNames);

    if (roleNames.contains("ROLE_ADMIN")) {

        response.sendRedirect("/security/admin.do");
        return;
    }

    if (roleNames.contains("ROLE_MEMBER")) {

        response.sendRedirect("/security/member.do");
        return;
    }

    response.sendRedirect("/security/index.do");

}
■ 로그아웃
- 로그인처럼.. URI 지정, 핸들러 등록
- AuthController.java > 메소드 추가
@GetMapping("/customlogout.do")
public String customlogout() {

    log.info("custom logout");

    return "customlogout";
}- views > "customlogout.jsp"
<%@ include file="/WEB-INF/views/inc/header.jsp" %>

<h2>Custom Logout Page</h2>

<form method="POST" action="/security/customlogout.do">
    <div>
        <button class="out">로그아웃</button>
    </div>
    <input type="hidden" name="${_csrf.parameterName}" value="${_csrf.token}">
</form>- security-context.xml -> 추가
<!-- 로그아웃 -->
<security:logout logout-url="/customLogout.do" invalidate-session="true" logout-success-url="/index.do"/>- header.jsp -> 추가
<li><a href="/security/customlogout.do">Logout</a>- 실행 결과

■ 계정 정보
- InMemoryUserDetailsManager를 사용한 방식
★ 데이터베이스를 활용한 계정 정보
- 1. 미리 정해진 구조의 스키마 사용 > 편해짐 > 제약 심함
- 2. 사용자가 직접 만든 구조의 스키마 사용 > 불편함 > 제약 약함
■ DB 생성
create table users (
   username varchar2(50) not null primary key,
   password varchar2(50) not null,
   enabled char(1) default '1'
);

create table authorities (
   username varchar2(50) not null,
   authority varchar2(50) not null,
   constraint fk_authorities_users foreign key(username) references users(username)
);

create unique index ix_auth_username on authorities (username, authority);

insert into users (username, password) values ('hong', '1111');
insert into users (username, password) values ('test', '1111');
insert into users (username, password) values ('admin', '1111');

insert into authorities (username, authority) values ('hong', 'ROLE_MEMBER');
insert into authorities (username, authority) values ('test', 'ROLE_MEMBER');
insert into authorities (username, authority) values ('admin', 'ROLE_MEMBER');
insert into authorities (username, authority) values ('admin', 'ROLE_ADMIN');
■ security-context.xml -> 추가
<security:jdbc-user-service data-source-ref="dataSource"/>
■ 파일 생성
com.test.auth > CustomNoOpPasswordEncoder.java- 코드 작성
@Log4j
public class CustomNoOpPasswordEncoder implements PasswordEncoder {@Override

	public String encode(CharSequence rawPassword) {

		log.info("before encode: " + rawPassword);

		return rawPassword.toString();
	}

	@Override
	public boolean matches(CharSequence rawPassword, String encodedPassword) {

		log.info("matches: " + rawPassword + ":" + encodedPassword);

		return rawPassword.toString().equals(encodedPassword);
	}

}- security-context.xml -> bean 추가
<!-- 암호화 객체 -->
<bean id="customPasswordEncoder" class="com.test.auth.CustomNoOpPasswordEncoder"></bean>

<!-- 인코더 추가 -->
<security:password-encoder ref="customPasswordEncoder"/>
★ 스프링 시큐리티에서 제공하는 암호화 방식
- 스프링 시큐리티
- BCryptPasswordEncoder 클래스를 사용
- bctypr(Blowfish > 암호화 해시 함수)
- 암호화 기능, 복호화 불가능- DB 생성
create table tbl_member (
   userid varchar2(50) not null primary key,
   userpw varchar2(100) not null,
   username varchar2(100) not null,
   regdate date default sysdate,
   updatedate date default sysdate,
   enabled char(1) default '1'
);

create table tbl_member_auth (
   userid varchar2(50) not null,
   auth varchar2(50) not null,
   constraint fk_member_auth foreign key(userid) references tbl_member(userid)
);- security-context.xml -> bean 추가
<!-- 암호화 객체 -->
<bean id="bcryptPasswordEncoder" class="org.springframework.security.crypto.bcrypt.BCryptPasswordEncoder"></bean>

<!-- 인코더 추가 -->
<security:password-encoder ref="bcryptPasswordEncoder"/>- 인증을 하는데 사용할 쿼리
select
    userid username,
    userpw password,
    enabled
from tbl_member
where userid = 'hong'- security-context.xml -> 쿼리 추가
<security:jdbc-user-service data-source-ref="dataSource"
users-by-username-query="select userid username, userpw password, enabled from tbl_member where userid = ?"/>- 권한을 확인하는 사용할 쿼리
select
	userid username,
    auth authority
from tbl_member_auth
where userid = ?- security-context.xml -> 쿼리 추가
<security:jdbc-user-service data-source-ref="dataSource"
     users-by-username-query="select userid username, userpw password, enabled from tbl_member where userid = ?"
authorities-by-username-query="select userid username, auth authority from tbl_member_auth where userid = ?"/>- src/test/java > com.test.security > MemberTest.java -> 사용자 추가
@RunWith(SpringJUnit4ClassRunner.class)
@ContextConfiguration({"file:src/main/webapp/WEB-INF/spring/root-context.xml", "file:src/main/webapp/WEB-INF/spring/security-context.xml"})
public class MemberTest {

	@Autowired
	private DataSource ds;

	@Autowired
	private PasswordEncoder encoder;

	@Test
	public void testInsertMember() {

		String sql = "insert into tbl_member(userid, userpw, username) values (?, ?, ?)";

		try {

			Connection conn = ds.getConnection();
			PreparedStatement stat = conn.prepareStatement(sql);

			stat.setString(1, "dog");
			stat.setString(2, encoder.encode("1111"));
			stat.setString(3, "강아지");

			stat.executeUpdate();

			stat.setString(1, "cat");
			stat.setString(2, encoder.encode("1111"));
			stat.setString(3, "고양이");

			stat.executeUpdate();

			stat.setString(1, "dong");
			stat.setString(2, encoder.encode("1111"));
			stat.setString(3, "동재");

			stat.executeUpdate();

		} catch (Exception e) {
			e.printStackTrace();
		}

	}

}- src/test/java > com.test.security > MemberTest2.java -> 권한 추가
@RunWith(SpringJUnit4ClassRunner.class)
@ContextConfiguration({"file:src/main/webapp/WEB-INF/spring/root-context.xml", "file:src/main/webapp/WEB-INF/spring/security-context.xml"})
public class MemberTest2 {

	@Autowired
	private DataSource ds;

	@Autowired
	private PasswordEncoder encoder;

	@Test
	public void testInsertMember() {

		String sql = "insert into tbl_member_auth(userid, auth) values (?, ?)";

		try {

			Connection conn = ds.getConnection();
			PreparedStatement stat = conn.prepareStatement(sql);

			stat.setString(1, "dog");
			stat.setString(2, "ROLE_MEMBER");

			stat.executeUpdate();

			stat.setString(1, "cat");
			stat.setString(2, "ROLE_MEMBER");

			stat.executeUpdate();

			stat.setString(1, "dong");
			stat.setString(2, "ROLE_MEMBER");

			stat.executeUpdate();

			stat.setString(1, "dong");
			stat.setString(2, "ROLE_ADMIN");

			stat.executeUpdate();

		} catch (Exception e) {
			e.printStackTrace();
		}

	}

}- 실행 결과
728x90