웹페이지
JAVASCRIPT STEP 47 - STYLE 다양한 알고리즘 - 1
IT의 큰손
2023. 4. 28. 15:47
728x90
★ 알고리즘 1
- 문서를 클릭하면 해당 위치에 이미지를 추가
■ HTML 코드
X■ CSS 코드
<style>
    .item {
        position: absolute;
        -webkit-user-drag: none; /* 잔상 제거 */
    }

</style>
■ JavaScript
<script>

    let item;

    window.onload = function() {

        window.onmousedown = function() {

            img = document.createElement("img");

            img.setAttribute("class", "item");
            img.setAttribute("src", "images/m01.png");

            img.style.left = (event.clientX - 64) + "px";
            img.style.top = (event.clientY - 64) + "px";

            document.body.appendChild(img);

        }

    }

</script>
■ 실행 결과

★ 알고리즘 2
- 문서를 클릭하면 해당 위치에 이미지를 추가
- m01.png ~ m10.png 무작위로 추가
- 이미지를 최대 10개까지 출력
- 10개가 넘어가면 오래된 순서대로 삭제
■ HTML 코드
X■ CSS 코드
<style>
    .item {
        position: absolute;
        -webkit-user-drag: none; /* 잔상 제거 */
    }

</style>
■ JavaScript
<script>

    let item;
    let imgCount;
    let firstImage = null;
    let n = 0;

    window.onload = function() {

        window.onmousedown = function() {

            imgCount = 0;

            if(n < 9) {
                n++;
            }else if (n =10) {
                n = 1;
            }

            img = document.createElement("img");

            img.setAttribute("class", "item");
            img.setAttribute("src", "images/m0" + n + ".png");

            img.style.left = (event.clientX - 64) + "px";
            img.style.top = (event.clientY - 64) + "px";

            document.body.appendChild(img);

            //최대 10개까지만
            for (var i=0; i<document.body.children.length; i++) {
                if (document.body.children[i].nodeName == "IMG") {
                    if (firstImage == null) {
                        firstImage = document.body.children[i];
                    }
                    imgCount++;
                }
            }

            if(imgCount > 10) {
                document.body.removeChild(firstImage);
                firstImage = null;
            }

        }

    };

</script>
■ 실행 결과
★ 알고리즘 3
- 마우스를 올리면 이미지를 이동.
- 마우스 접근 방향에 따라 이미지 이동 방향을 다르게 함.
■ HTML 코드
<img src="images/m05.png" id="img1">■ CSS 코드
<style>
    #main, main {
        position : static;
    }
    #img1 {
        position : absolute;
        -webkit-user-drag: none; /* 잔상 제거 */
    }

</style>
■ JavaScript
<script>

    var img1;

    window.onload = function() {
        img1 = document.getElementById("img1");

        img1.style.left = "530px";
        img1.style.top = "200px";

        img1.onmouseover = function() {
            var ox = parseInt(img1.style.left);
            var oy = parseInt(img1.style.top);

            if ((parseInt(event.clientX) >= ox + 60) && parseInt(event.clientX) <= ox + 120) {
                img1.style.left = ox - 60 + "px";
            }

            if ((parseInt(event.clientX) <= ox + 60) && parseInt(event.clientX) >= ox) {
                img1.style.left = ox + 60 + "px";
            }

            if ((parseInt(event.clientY) >= oy + 50) && parseInt(event.clientY) <= oy + 100) {
                img1.style.top = oy - 50 + "px";
            }

            if ((parseInt(event.clientY) <= oy + 50) && parseInt(event.clientY) >= oy) {
                img1.style.top = oy + 50 + "px";
            }
        }
    };

</script>
■ 실행 결과

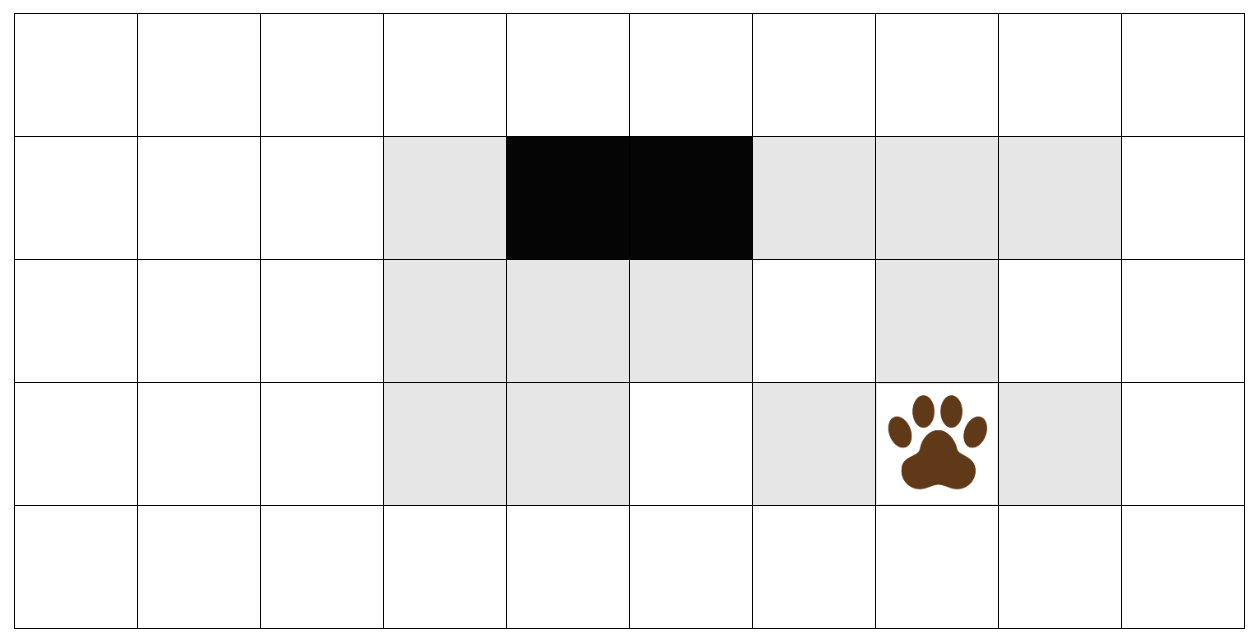
★ 알고리즘 4
- 발자국이 눌려진 곳은 점점 흙이 쌓인다.
- 누르는 횟수가 증가할 수록 배경 이미지를 어둡게 한다.
- td.style.backgroundColor = rgb(n1,n2,n3);
- 완전히 더러워진 칸은 더 이상 누를 수 없다.
■ HTML 코드
<div class="main">

    <table id="tbl1">
        <tr>
            <td class="cell" data-color="255"></td>
            <td class="cell" data-color="255"></td>
            <td class="cell" data-color="255"></td>
            <td class="cell" data-color="255"></td>
            <td class="cell" data-color="255"></td>
            <td class="cell" data-color="255"></td>
            <td class="cell" data-color="255"></td>
            <td class="cell" data-color="255"></td>
            <td class="cell" data-color="255"></td>
            <td class="cell" data-color="255"></td>
        </tr>
    </table>


</div>
■ CSS 코드
<style>
    body {
        margin: 30px 50px;
    }
    #tbl1 {
        border: 1px solid black;
        border-collapse: collapse;
    }
    #tbl1 td {
        border: 1px solid black;
        width: 120px;
        height: 120px;
    }
    #tbl1 td img {
        display: block;
        width: 120px;
        height: 120px;
    }
</style>
■ JavaScript
<script>

    var time = 0;
    var index = -1;
    let cell, btn1;

    window.onload = function() {

        cell = document.getElementsByClassName("cell");
        btn1 = document.getElementById("btn1");

        for (var i=0; i<cell.length; i++) {
            cell[i].onclick = function() {
                if (event.srcElement.nodeName == "TD" ) {

                    for ( var j=0; j<cell.length; j++) {
                        cell[j].innerHTML = "";
                    }

                    var c = parseInt(event.srcElement.dataset["color"]);
                    c-=25;
                    if (c>=0) {
                        event.srcElement.style.backgroundColor = "rgb(" + c + "," + c + "," + c + ")";
                        event.srcElement.dataset["color"] = c;
                    } else {
                        event.srcElement.onclick = null;
                    }
                    event.srcElement.innerHTML = "<img src='images/dog-foot2.png'>";


                }
            };
        }

    };

</script>
■ 실행 결과
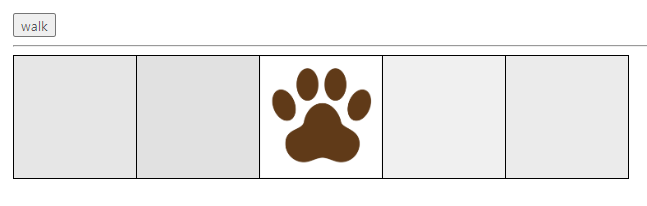
★ 알고리즘 5
- 버튼을 누르면 발자국을 옮긴다.
- 발자국이 지나간 곳은 점점 흙이 쌓인다.
- 완전히 검게 변하면 밝자국을 멈춘다.
- td.style.backgroundColor = rgb(n1, n2, n3);
■ HTML 코드
<input type="button" value="walk" id="btn1">
<hr>
<table id="tbl1">
    <tr>
        <td class="cell"></td>
        <td class="cell"></td>
        <td class="cell"></td>
        <td class="cell"></td>
        <td class="cell"></td>
    </tr>
</table>
■ CSS 코드
<style>
    body {
        margin: 20px;
    }
    #tbl1 {
        border: 1px solid black;
        border-collapse: collapse;
    }
    #tbl1 td {
        border: 1px solid black;
        width: 120px;
        height: 120px;
    }
    #tbl1 td img {
    display: block;
        width: 120px;
        height: 120px;
    }
</style>
■ JavaScript
<script>
    var timer = 0;
    var index = -1;
    var cell, btn1;
    var foot = "left";
    var c = 255;

    window.onload = function() {

        cell = document.getElementsByClassName("cell");
        btn1 = document.getElementById("btn1");

        btn1.onclick = function() {
            timer = setInterval(function() {
                if (index > -1) {
                    cell[index].innerHTML = "";
                    cell[index].style.backgroundColor = "rgb(" + c + ", " + c + ", " + c + ")";
                    c-=5;
                    if(c<0) clearInterval(timer);
                }
                index++;
                if(index == 5) index = 0;
                    cell[index].innerHTML = "<img src='images/dog-foot2.png'>";
                if (foot == "left") foot = "right";
                else foot = "left";

            }, 300);
        };

    };
</script>
■ 실행 결과
728x90